Identification Guides · Oct 2026 (B.E. 2569)
Luang Pu Thuat B.E. 2497 Large Mold A: From Mold Lines to Three-Surface Material
Using the video and owner-supplied photographs of actual examples from the same issue, this guide orders the head-side ridge, shoulder excess, fine lines and material across front, edge and back into a repeatable chain of observation—not a one-point verdict.
17 min
Luang Pu Thuat B.E. 2497 Large Mold A: From Mold Lines to Three-Surface Material
Using the video and owner-supplied photographs of actual examples from the same issue, this guide orders the head-side ridge, shoulder excess, fine lines and material across front, edge and back into a repeatable chain of observation—not a one-point verdict.
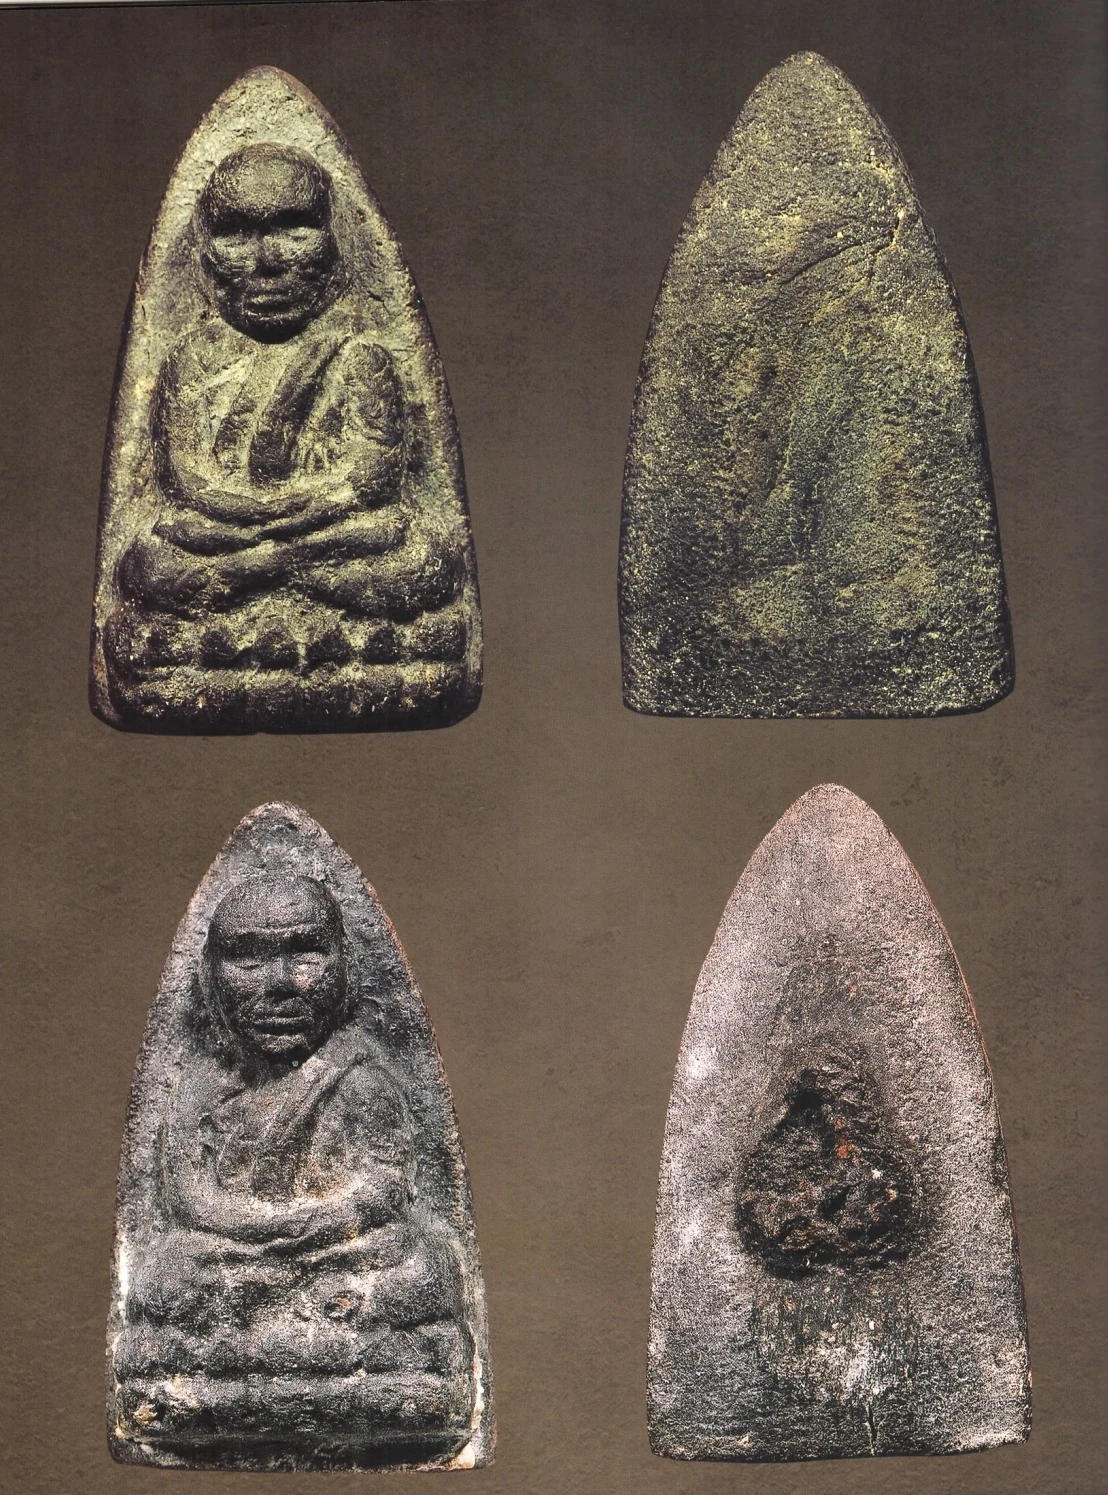
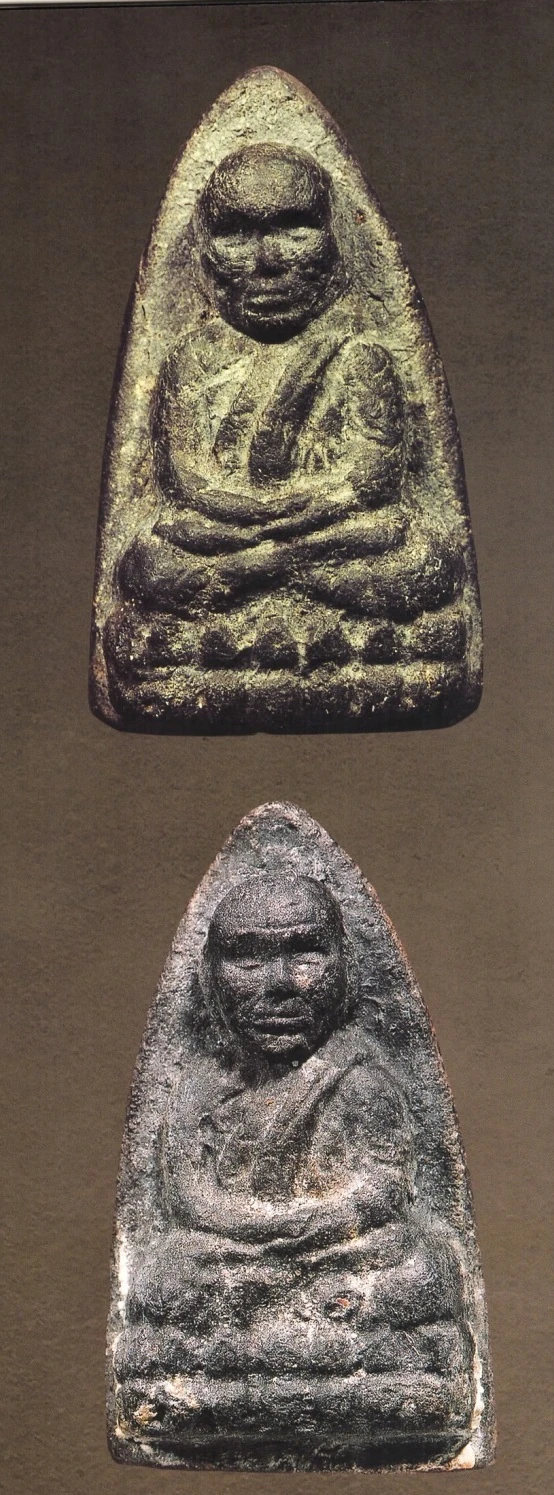
The video examines Luang Pu Thuat—หลวงปู่ทวด—in the B.E. 2497, or 1954, herbal-material issue known in Thai as เนื้อว่าน, focusing on Large Mold A, พิมพ์ใหญ่ A. Its two specimens are not arranged as genuine versus fake. They are reference examples in different states of preservation, showing how one family of mold evidence can survive in different degrees of clarity.
A boundary is essential. Photographs and video can teach position, geometry and relationships, but they do not certify an object. Lighting, focal length, dirt, wear, repair and digital sharpening can all alter apparent detail. The method below is therefore a screening and recording procedure: it tests whether evidence agrees and identifies what still requires physical examination.
The correct sequence is not ‘find one line and decide.’ Confirm period and mold first, read fixed positional relationships next, and only then cross-check material on front, edge and back.
Step one: earn entry into the Large Mold A comparison group
Before chasing tiny lines, record the whole: tablet proportions, arched border, figure scale, the head’s relation to shoulders and seated base, and overall relief depth. The market shorthand ‘large head with a line’ is an entry point, not an answer. Detached from proportion and exact position, both ‘large head’ and ‘has a line’ can pull unrelated molds into the same group.
Begin with a conclusion-free description: ‘oval arch, seated figure occupies a large field, this head-to-shoulder spacing, a raised area at the upper-right shoulder, a short line beside the head.’ Only then compare several traceable, confidently classified references. When the seller’s label is the only provenance, ‘possible Large Mold A’ is more rigorous than certainty.
The head-side ridge: ask where it begins, not merely whether it exists
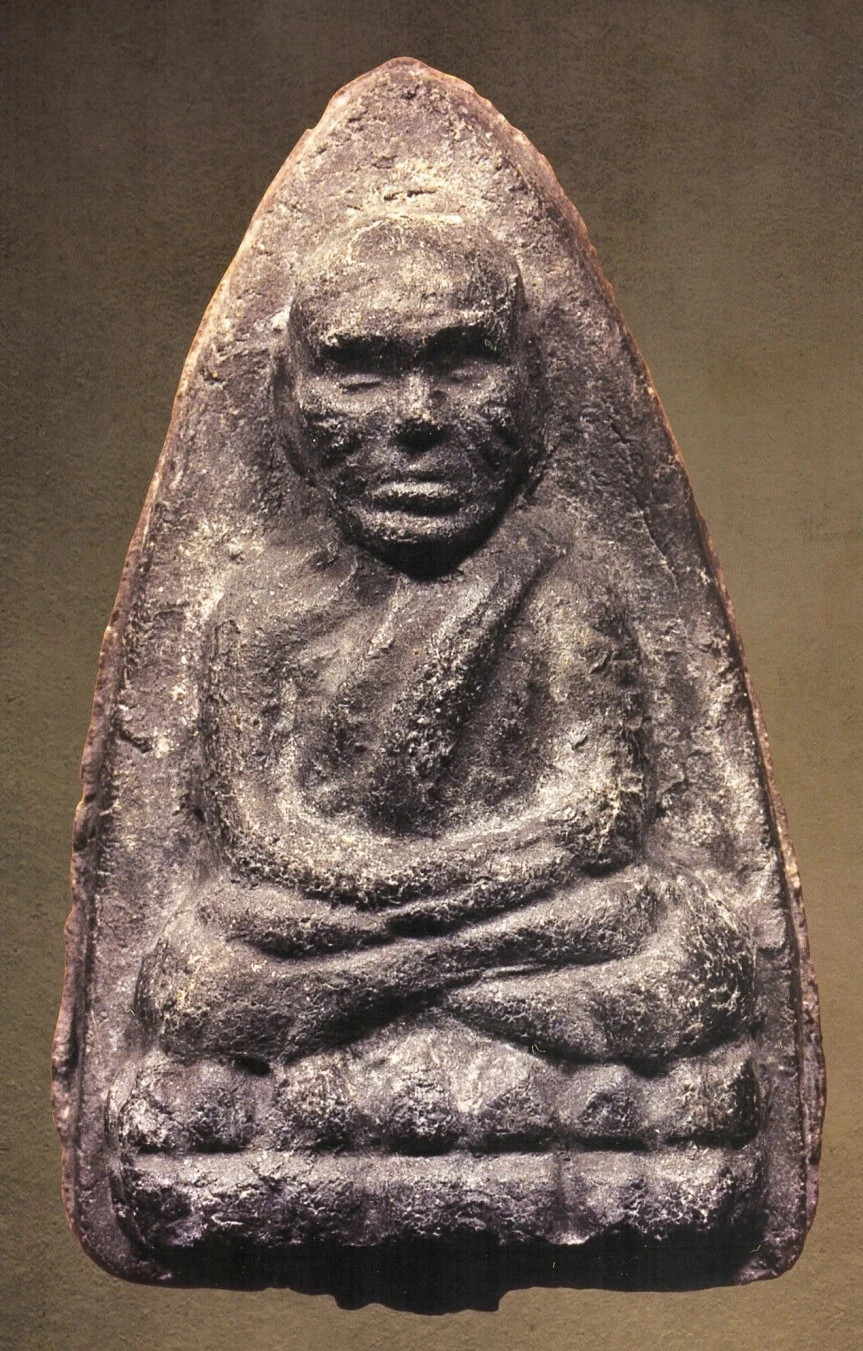
A commonly cited landmark is the short ridge extending beside the head on the viewer’s right. Fix the object’s orientation and do not mix the figure’s right with the viewer’s right. Record the ridge’s height beside the head, angle, length, thickness and whether it joins the head contour naturally. Compression, cracking, scratches and specular light can all create a line-like image, so existence alone proves little.
Align reference and subject to the same orientation and approximate scale. Imagine horizontal guides through crown, eyes, nose base and chin, then locate the short ridge within that grid. A positional mismatch remains significant even if the shape looks similar. A match still requires the shoulder and other fine lines; the inquiry cannot end at point one.
Shoulder excess: separate a fixed mold feature from random topography
The second area lies around the upper shoulder on the viewer’s right. The video is not pointing to any bump whatsoever, but to raised excess whose shape and position relate to a specific shoulder line. Note which segment it touches, its distance from robe or border, and how its base merges into the relief. Herbal material naturally carries pits, lost grains, compression and later knocks. A displaced bump or fresh sharp chip does not become the same feature merely because it protrudes.
Link the fine lines of head, neck, side and hand
Compare upper-head or head-side lines, neck-to-side junctions and the fine rising line around the hands point by point. Two illusions are common: a random ridge left by wear is mistaken for original engraving, or a later scratch is mistaken for a raised mold line. Move raking light from side to side. A raised ridge develops a bright edge and a continuous opposite shadow; an incised scratch reverses that relation. With only a flat-lit front photograph, record ‘relief direction unconfirmed’ rather than inventing it.
Read the face as a volume: forehead, cheeks, nose-mouth area and chin, together with head-to-shoulder proportion. When features wear flat, the larger facial mass and outer contour often survive. Do not force every eyebrow and eye out of a worn piece; ask first whether head shape, facial width and neck placement still agree with the reference group.
Material is not one coloured grain: trace front, edge and back
The video turns to material only after mold analysis, and that order matters. White, black and muted red particles are visible in the examples, but the useful question is not whether all three colours exist. Ask whether grains belong to the body, vary naturally in size, continue beneath the surface, and form a coherent composition across front, edge and back. Added paint, stuck sand or artificial ageing may create local appearance without three-surface continuity.
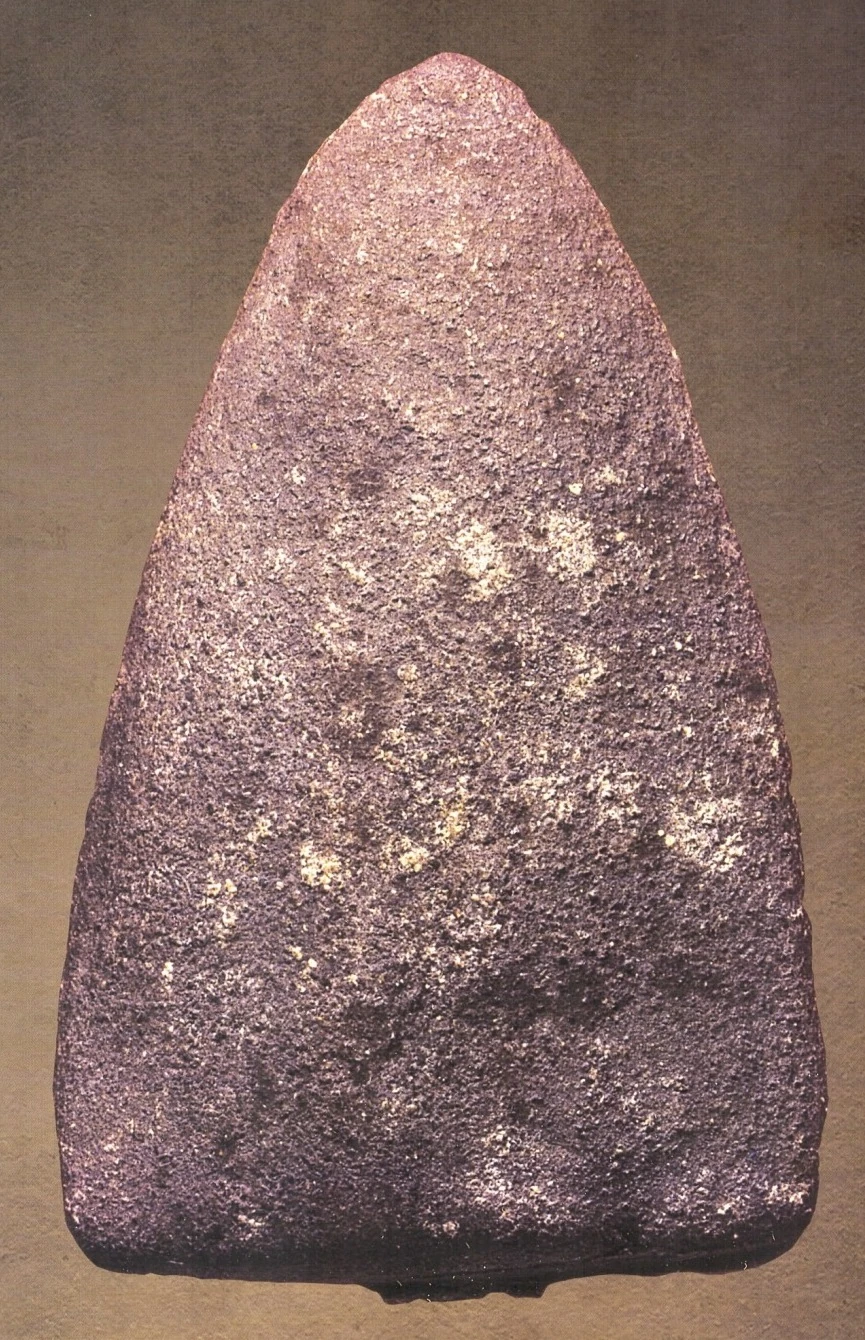
The edge is especially useful because it exposes the body through thickness. If the face has abundant particles but the edge is completely uniform, an explanation is required. A reverse altered by handling, casing or cleaning should not be declared a different material from colour alone; inspect grain boundaries, pores and matrix. White balance changes hue readily, while structure is usually more dependable.
Wear is not a defect list; it is a transformation to explain
The second reference is useful precisely because it is more worn. Natural wear generally rounds the highest points first—face, shoulders, knees and border—while recesses and protected corners retain more. If a hair-fine line looks unusually sharp while every surrounding high point is heavily flattened, the preservation logic conflicts; test for later incision, cracking or image enhancement.
Tone is not a fixed gauge of wear. Skin oil, dust, old cases, light exposure and camera processing can make related material look dark or pale. With worn pieces, demote colour. Ask whether landmarks remain at plausible levels, whether relief rounds in directions consistent with contact, and whether grains continue through newly exposed surfaces.
A repeatable seven-step inspection sequence
- 01Record the proposed classification: Luang Pu Thuat หลวงปู่ทวด, B.E. 2497/1954, herbal material เนื้อว่าน, Large Mold A พิมพ์ใหญ่ A; retain ‘possible’ when evidence is incomplete.
- 02Read proportions, border, head-shoulder relationship, posture and relief mass before accepting the sales title.
- 03Locate the ridge beside the head on the viewer’s right: record origin, height, angle, length and junction rather than ticking ‘line present.’
- 04Check the upper-right shoulder excess for fixed position, shape and base; exclude pits, chips and random grains.
- 05Compare head, neck, side and hand lines together with facial form; use raking light to distinguish raised lines from scratches.
- 06Make macro records of front, edge and back; test whether white, black and red grains form a coherent three-surface material structure.
- 07Synthesize only at the end and list uncertainties. No single line, colour, sense of weight or story independently guarantees authenticity.
How to photograph what you actually see
At minimum capture front, back, all four edges, and macro details of head-side ridge, shoulder, hands and grains. Keep the sensor parallel to the face. Make one colour record under diffuse frontal light, then opposing low-angle raking-light records for relief. Disable beauty filters, texture enhancement and aggressive HDR. Place a neutral grey card or scale beside—not over—the edge. Preserve originals and export crops separately so later viewers can audit sharpening and compression.
Conclusion: authentication is a chain of evidence, not a password
The method does not ask collectors to memorise secret marks. It restores each mark to mold, position, preservation and material. A matching head-side ridge leads to the shoulder; a matching shoulder to head, neck and hand lines; matching lines to face and overall proportion; and only then to material across three surfaces. Preserve conflicts at every step instead of hiding them beneath ‘old pieces are all different.’
When evidence supports only ‘mold resemblance,’ stop there. When the edge is absent, write ‘edge not examined.’ Such restraint strengthens connoisseurship by telling the next observer what evidence to add. The embedded video preserves moving light and point-by-point commentary on two references; pause and revisit it alongside this sequence.
Video demonstration: Luang Pu Thuat B.E. 2497 Large Mold A—mold landmarks and material grains
The video loads and streams from YouTube rather than this site. Both objects shown are references, not a genuine-versus-fake comparison.
Open on YouTube